



Virtual try-on is a visual preview of clothing, accessories, or beauty products on a person or model. The useful question is not whether the image looks impressive. It is whether the preview helps you decide what deserves a closer look.
There are several types of virtual try-on, and they solve different problems. A glasses filter is not the same as an own-photo clothing preview. A model selector is not the same as placing a product image on your own body. Understanding the format makes it easier to know what the result can and cannot tell you.
This guide explains the category, its best use cases, and its limits. If you want the exact upload workflow, use the step-by-step virtual try-on guide. If your inputs keep producing weak results, use the photo troubleshooting guide.
What virtual try-on means
Virtual try-on uses a camera view, a preset model, or a saved photo to create a visual reference for a product. In fashion, that can mean placing one garment on a person, changing an existing outfit, or building a complete look from several pieces.
The preview is an image-based estimate. It is not a physical fitting and it does not inspect the real garment. That distinction matters because virtual try-on is strongest at questions about appearance and weak at questions about physical fit.
The four common types
Live camera overlays
A live camera effect places an item over the current camera view. This format is common for glasses, makeup, jewelry, and products with a predictable position. It is fast and interactive, but it may behave more like a filter than a finished photograph.
Preset model previews
A retailer may let you choose from several models or body types. This gives more context than a product-only image and can make length or styling easier to understand. The result still belongs to the selected model, so it may not answer whether the style feels like you.
Own-photo clothing previews
An own-photo tool combines a clear picture of you with a separate image of a garment or outfit. This is the format used by TryAnyOutfit. It is useful because your face, proportions, coloring, and existing style are part of the comparison.
Text or reference-based outfit edits
An editor can change clothing in an existing photo from a written instruction or a product reference. This is useful for testing an idea, changing one color, or exploring a style that does not yet exist as a product page. A reference image is usually better when the exact item matters.
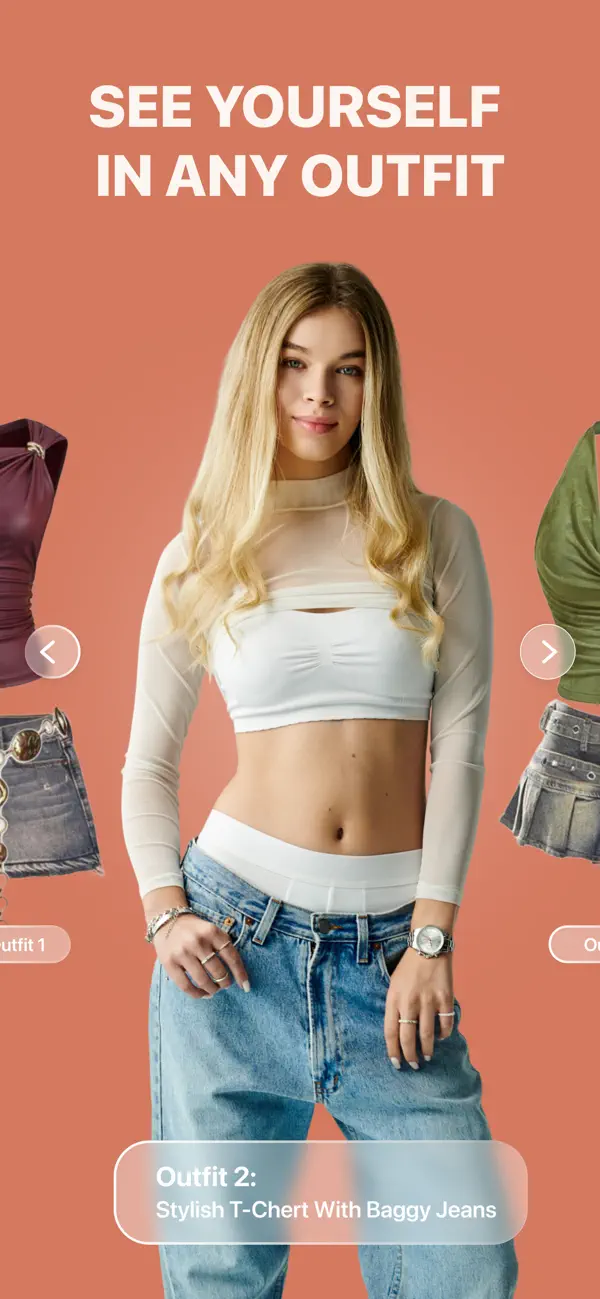
What an own-photo preview can show
The current TryAnyOutfit interface shows the same person in different outfit directions. That makes the comparison personal without pretending to measure the clothes. You can judge whether a color works near your face, whether a silhouette feels familiar, and whether a bolder option still looks like something you would wear.
Virtual try-on is especially useful for:
- comparing two colors or prints on the same person;
- testing an unfamiliar neckline, sleeve, or silhouette;
- checking whether a garment works with your general style;
- planning an event outfit before ordering several options;
- seeing whether a saved product fits the rest of an outfit idea;
- narrowing a long shortlist to the items worth measuring and reviewing.
The advantage is comparison. Use the same source photo for every option, then look for meaningful differences. If you change the pose, lighting, and background for every garment, you may end up comparing photographs rather than clothes.
What it cannot confirm
A clothing preview cannot feel fabric, test a zipper, or confirm how a waistband behaves after several hours. It does not replace a size chart, garment measurements, material details, customer reviews, or the store return policy.
It also cannot guarantee exact product reproduction. Small logos, lace, fine stripes, layered straps, and unusual hems may change in a generated image. The result can look polished while one important construction detail is wrong. Compare it with the original product image before using that detail to decide.
| Question | Useful source |
|---|---|
| Do I like this color or silhouette on me? | Virtual try-on preview |
| Will the waist, chest, or hip measurement fit? | Size chart and garment measurements |
| Will the fabric feel soft, heavy, or warm? | Material details and reviews |
| Is the item easy to return? | Store return policy |
| Does a print or trim match the listing exactly? | Original product photos |
How to read the result
Start with the big decision. Does the outfit direction work? Look at color, visual balance, overall length, and how formal or casual the combination feels. Those are the questions a preview can answer most reliably.
Then inspect the garment facts that matter. Compare the neckline, sleeves, waist, hem, pattern, and closures with the source image. If one of those facts changed, treat that part of the preview as uncertain. A second result with a clearer reference may help, but it should not outrank the product listing.
Finally, ask whether the image changed you. Check the face, hair, pose, hands, and visible body position. A result that alters several identity or anatomy details is weaker evidence than one that keeps the person stable.
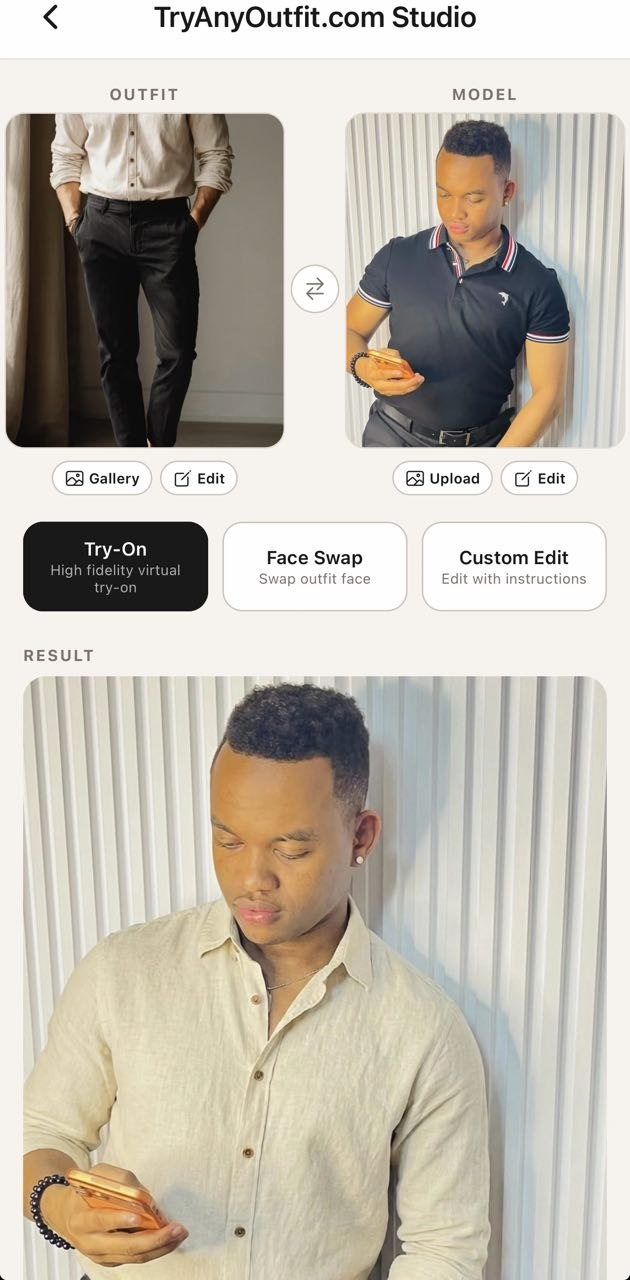
When virtual try-on is most useful
Use it early enough to change your mind, but late enough that the options are real. Previewing fifty random dresses creates more pictures, not more certainty. Previewing three dresses that match your budget, delivery date, and dress code gives you a decision.
It is also useful when the risk is stylistic rather than technical. A new color, a different trouser shape, a stronger shoulder, or an unfamiliar print can be hard to imagine from a model photo. Seeing the idea on your own photo helps you decide whether it is worth trying in person or ordering with a reasonable return option.
When to skip it
Skip the preview when the deciding issue is fabric performance, compression, support, protective function, or a precise physical fit. Activewear, bras, tailored formalwear, footwear, and safety clothing often need information an image cannot provide.
Also skip it when the available product image hides most of the garment. A low-resolution side view can make the tool invent the front. Finding a clearer reference is more useful than generating several guesses from a weak one.
Use personal photos deliberately
An own-photo preview requires a personal image, so check the service terms and privacy information before uploading. Use a photo you are comfortable saving to that account. Avoid images that include children, private documents, home addresses, work badges, or other people who did not agree to the upload.
Keep the source practical. A neutral photo can answer a clothing question without revealing more of your surroundings than necessary. Delete unused images or results when the service offers that control, and protect the account with the same care you would use for any photo library.
A sensible decision process
- Choose two or three realistic products.
- Use one clear source photo for the comparison.
- Judge color, silhouette, and outfit direction first.
- Compare important details with the product image.
- Check measurements, materials, reviews, delivery, and returns.
- Buy only when the visual preview and the product facts both make sense.
Virtual try-on is worth using when it removes a visual unknown. It is not a promise that the physical item will fit. For a purchase-specific process, continue with the before-checkout guide.