



The hardest part of online shopping is not finding clothes. Stores are exceptionally good at that part. The hard part is deciding whether the thing that looks perfect on a styled model will still feel like your style when your face, body, shoes, and ordinary Tuesday are involved.
You can try on clothes virtually with one clear photo of yourself and one image of the garment. The process is simple. Getting a result you can actually use depends on a few choices before you tap the button.
Step 1: decide what you want the preview to answer
Start with one question. Are you comparing colors? Testing a silhouette? Planning a date-night outfit? Checking whether a jacket works with your favorite jeans? The question determines the source photo you need.
For a top, use an upper-body or full-body photo where your torso is clear. For trousers or a long dress, show your whole body. For an outfit decision, include the shoes and any pieces you want to keep.
A virtual preview is strongest when it answers a visual question. It can help with color, proportion, styling, and overall impression. It cannot tell you whether a size fits or a seam feels comfortable. Save those questions for the size chart and reviews.
Step 2: take a clean photo of yourself
You do not need a blank studio. Stand in a place with even light and enough distance for the camera to see the area you want to dress. Face a window if possible. Set the camera around waist or chest height. A phone propped on a shelf with a timer is often better than a close mirror selfie because it avoids the wide-angle stretch at the edges.
Stand naturally with your arms slightly away from your torso. Keep your hands out of pockets if you are testing trousers. Move long hair away from the neckline if the top or dress has details there. Wear a simple base layer that shows your outline.
- Keep the image sharp enough to see your face and body edges.
- Leave a little space above your head and below your feet.
- Avoid very dark clothing against a dark background.
- Do not use a photo where furniture blocks the outfit area.
- Skip extreme angles unless you want the angle to shape every result.
Take two or three versions while you are already standing there. Future you will appreciate having an upper-body, full-body, and slight side pose ready instead of recreating the same living-room tripod situation every time a sale appears.
Step 3: choose a useful clothing image
Use a retailer product image, your own clothing photo, or a clean screenshot. The front of the garment should be visible. Crop away menus, captions, and nearby products. If the item is photographed on a person, pick the least obstructed pose.
For an item from your closet, hang it against a contrasting wall or lay it flat in bright light. Smooth large folds so the shape is readable. Photograph the entire piece rather than cutting off cuffs or hems.
When a garment has an important back, save a separate back view. The first preview should solve the front. Trying to make one reference image explain both sides usually gives neither side enough attention.
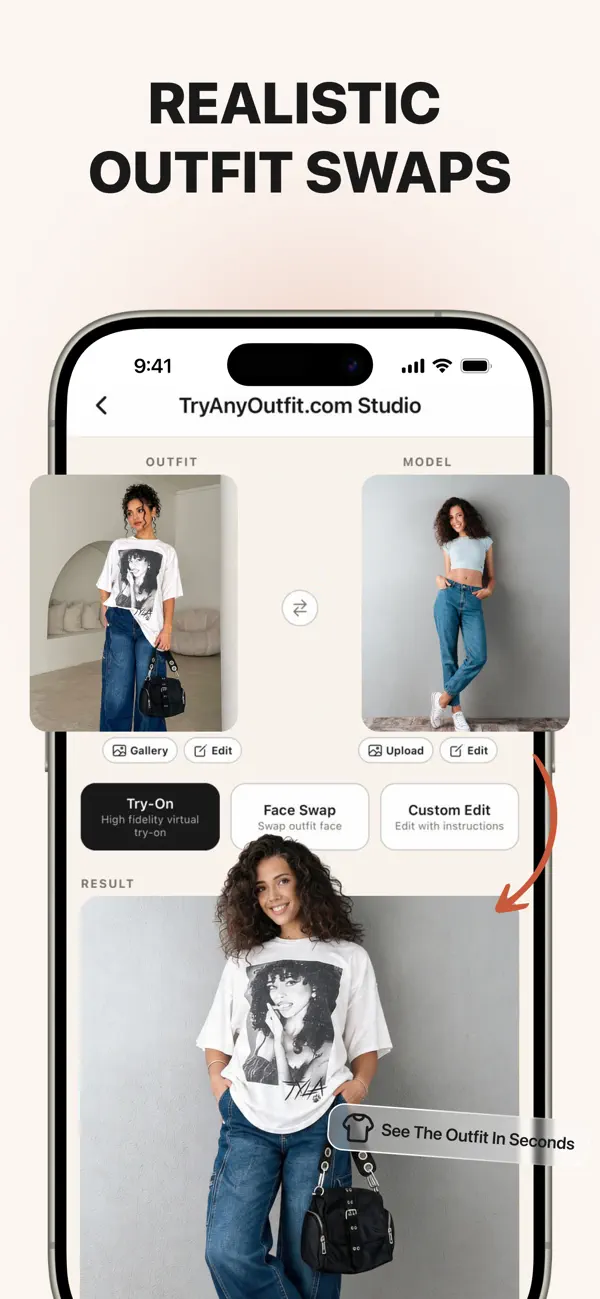
Step 4: generate the first try-on
Add your person photo and clothing image, then choose the try-on option. Keep the first attempt straightforward. Do not change the background, pose, hair, makeup, and lighting at the same time. You want to see the garment, not audition a replacement life.
When the result appears, look at the full image before zooming in. Does the outfit feel balanced? Does the color work? Is the silhouette what you expected from the product photo? If the answer is clearly no, you have already learned something useful.
Step 5: check the result against both inputs
Open the source photo and garment image beside the result. Make sure your face, hair, pose, and background stayed recognizable. Then check the clothing details that matter: neckline, sleeves, waist, hem, print, and closures.
No generated preview is a product measurement. A sleeve may look perfectly placed even when the real garment runs long. Use this comparison to catch visual errors, not to certify physical fit.
Step 6: fix one problem at a time
If the output looks wrong, identify the biggest cause. A blurry item needs a better garment image. A distorted pose needs a clearer person photo. A missing pattern needs more detail in the reference. Change one input and try again.
If the outfit shape is wrong
Choose a front-facing product image with the full outline visible. Avoid a garment that is folded, twisted, or covered by a model’s arms. For a fitted item, use a source photo where your own torso is not hidden by an oversized layer.
If the face or body changed
Return to the original person photo. Use a sharper image and a simpler pose. Do not regenerate from an already altered result, because small changes can stack up with every round.
If the hands look odd
Hands near waistbands, pockets, buttons, and jacket openings create tricky overlaps. Try a source picture with relaxed arms. If you love the pose, use the image for broad outfit comparison and ignore small hand details rather than pretending they are fashion information.
Step 7: compare a small set of options
Use the same photo of yourself for each garment in the shortlist. Save every result. Compare three options together instead of making a decision immediately after each one.
The side-by-side view often changes the winner. A dress that looked fine alone may feel less interesting beside another color. A jacket you nearly ignored may be the only one that works with your existing jeans and shoes.
Give each option a practical score:
- Do I like the color on me?
- Does the silhouette feel like my style?
- Can I wear it with at least two things I own?
- Does it work for the occasion I have in mind?
- Would I still want it at full price?
Step 8: finish with real fit information
Once a visual favorite emerges, go back to the listing. Check measurements and material. Read reviews that mention sizing. Look for customer photos. Compare the item with a similar garment you already own.
If the store provides garment dimensions, use them. Measure a favorite piece laid flat and compare chest, waist, rise, inseam, or length. Body-size charts are a starting point. Garment measurements show how much room the actual clothing has.
Check the return policy before checkout. Even excellent preparation cannot tell you how a fabric feels or how a waistband behaves after two hours. A reasonable return window is part of the product, whether the store puts it near the pretty photos or not.
What virtual try-on is best at
It is best at turning vague interest into a more specific opinion. Instead of “I like that dress,” you can decide “I like the color, but the high neckline is not for me,” or “The cropped jacket makes more sense with my wardrobe than the long one.”
That is enough to make online shopping calmer. You are not asking one image to predict the future. You are asking it to reveal your taste before a box arrives.
When you are ready, try one outfit on your own photo. If you are choosing between store items, the store screenshot guide shows how to prepare product images that are easier to compare.
What the current workflow shows
The current Studio screen mirrors the workflow above: outfit image, person image, Try-On mode, then result. Face Swap and Custom Edit are separate choices, so use Try-On when the goal is a clothing preview. Keeping those jobs separate makes the result easier to judge.
If the result has weak hands, framing, or garment detail, use the photo troubleshooting guide. If you only need definitions and limitations, read the virtual try-on guide.